This post is part of my “Rusty-PID” series, in which you can follow my adventure building a PID Controller for my Rancilio Silvia in Rust.
In this blog post we’ll dive into how to read temperature measurements from the TSic sensor in Rust. It goes pretty deep into the implementation details and the porting process, so if you just want to use it go straight to the tsic-rs repository and don’t look back.
A note before we start: I’m using the TSic 306 sensor, which is a digital sensor. If you happen to use the other digital one on the market (the 206) the same instructions should apply. I have never used the analog variants (201 and 301) and they do not use the protocol outlined below.
TSic 306 Fundamentals
The TSic 306 is a digital sensor which speaks the ZACWire protocol. It has an operating temperature range from -50°C to 150°C and a pretty good resolution. Please see the data sheet (linked above) for all the details. It comes in two different housings (SOP-8 and TO92) but in any case there are three pins that are important:
- Voltage (3V to 5.5V)
- Signal
- Ground
The raw temperature bits are read off of the signal pin (using the ZACWire protocol). You can decide to either supply continuous voltage or just supply voltage for the time period of reading a measurement. In the former case the sensor will keep sending data in intervals and easier to handle, but if you are running in a power constrained environment turning it on and off is definitely an option. Note that in my use case I need to read sensor data every second so I didn’t bother with controlling the voltage pin and always supply it with power.
Since my background is not in hardware I had some fair amount of head-scratching to do when trying to figure out how the actual bit reading works using the ZACWire protocol. If you want to get all the details, including a reference implementation in assembly, please see the application notes sheet linked above.
To read a full temperature measurement, we need to read two packets. Each packet consists of a start bit, 8 data bits and finally a parity bit. The first packet contains the most significant bit (MSB) while the second packet contains the LSB (least significant bit) at the end.
(High) Packet 1:                                               (Low) Packet 2:
+-------+---+---+-----+-----+-----+-----+----+----+--------+---+-------+----+----+----+----+----+----+----+----+--------+
| Start | 0 | 0 | D13 | D12 | D11 | D10 | D9 | D8 | Parity |   | Start | D7 | D6 | D5 | D4 | D3 | D2 | D1 | D0 | Parity |
+-------+---+---+-----+-----+-----+-----+----+----+--------+---+-------+----+----+----+----+----+----+----+----+--------+
                   ^                                                                                        ^
                  MSB                                                                                      LSB
As recommended in the application notes, the start bit will be used to figure out the strobe length (the interval to wait between reading the data and parity bits). According to the spec we must use a 128kHz sampling rate, which is 7.8 microseconds. Unfortunately as we’ll see later we can only wait with microsecond precision, so we are going to sample with 8 microseconds instead. I’ve seen some C code even sample with 10 microseconds and it still works fine.
Finally, there is also a stop bit between the two packets which we need to ignore.
Excursion: embedded-hal
When implementing a generic sensor library for embedded systems in rust, it is always a good idea to take a look at the embedded-hal crate, because it provides common traits for components of embedded systems. Ideally the library only depends on embedded-hal traits and then the board’s HAL implements those traits for its components.
In this case, the code needs to depend on two traits:
- InputPin: this is the digital (GPIO) pin where we are reading the bits from.
- DelayUs: since we need to respect the strobe interval, this trait allows us delay for a certain number of microseconds.
Basic Usage
Before we dive into the implementation details, it makes sense to run through some sample code so you get the idea on how to use it first. I’m using the nRF52840 DK which is supported by the nrf-hal.
Here is a picture of my (simplified) setup:
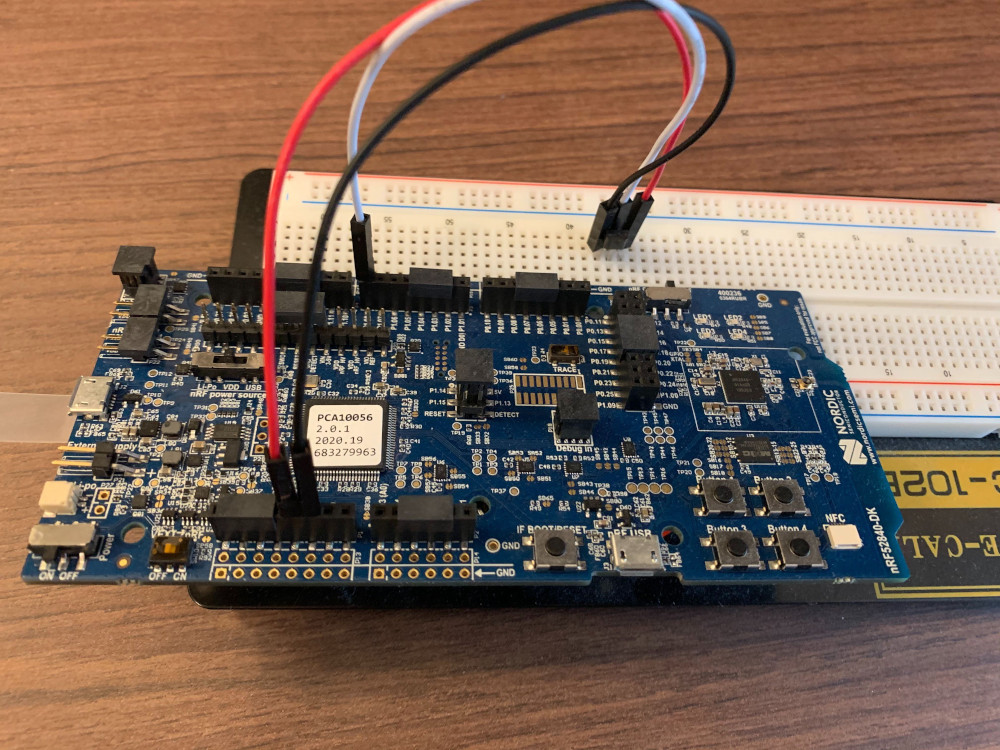
Both the voltage and ground pins are fed from one side of the nrf board and the signal input pin is set on one of the available GPIO ports - in this case 1.08.
Before we can use the sensor, we need both our input pin and our delay timer:
|
|
Next up, we initialize the Tsic:
|
|
Now we can ask it for a temperature reading and match on the results:
|
|
One thing to note is that while the Tsic takes ownership of the input pin, we only pass the timer in when we perform a sensor reading. This allows us to reuse the timer for other purposes in our embedded application.
This example uses the amazing defmt library for logging - if you haven’t already you should check it out!
Here is the full example which prints a reading every second:
|
|
Using probe-run to run our code, the output looks as follows:
$ cargo run --bin simple
    Finished dev [optimized + debuginfo] target(s) in 0.08s
     Running `probe-run --chip nRF52840_xxAA --defmt target/thumbv7em-none-eabihf/debug/simple`
  (HOST) INFO  flashing program
  (HOST) INFO  success!
────────────────────────────────────────────────────────────────────────────────
0.000000 INFO  Temp is: 21.91011
└─ simple::__cortex_m_rt_main @ src/bin/simple.rs:29
0.000001 INFO  Temp is: 21.91011
└─ simple::__cortex_m_rt_main @ src/bin/simple.rs:29
0.000002 INFO  Temp is: 22.00782
└─ simple::__cortex_m_rt_main @ src/bin/simple.rs:29
0.000003 INFO  Temp is: 21.91011
└─ simple::__cortex_m_rt_main @ src/bin/simple.rs:29
As you can see we get accurate readings every second. Next up, the gory details.
Implementation: from C to Rust
I started out with the C implementation from Schm1tz1/arduino-tsic, because that’s the one used in the Rancilio PID project. It is written for the arduino platform and roughly 150 lines of code. It has a couple properties which I didn’t really like and wanted to change when doing the rust port:
- The user needs to pass around the “raw” value
- Error handling is neither user friendly nor documented
- Obviously it’s C style and not even close to idiomatic/high level Rust
So you would use the C library like this:
|
|
Let’s start with a proper error enum:
|
|
If you look at the corresponding C-Code, it just returns with 0 in any of those cases.
The next concept we can encapsulate is the Packet. As you know from the previous section, we collect two packets and turn them into a Temperature.
|
|
Note that our raw type for a packet is u16 and not u8 since we also need to carry the parity bit in addition to the data bits. When we construct the Packet, we can perform the parity check immediately and return a ParityCheckFailed:
|
|
In case you are newer to embedded programming and don’t know what a parity check is: all it does, is check if the 1s and 0s are either even (even parity) or odd (odd parity). The ZACWire protocol specifies an even parity, so we need to have an equal amounts of ones and zeroes in our packet. This is a very simple data corruption check, but also not a very robust one (if two bits flipped it cannot be detected).
Before I show you the rust implementation, here is the C version:
|
|
We loop the bits and count the ones, and then perform a modulo operation on it to check if it is even. Afterwards, the parity bit is deleted. While not super long, I find it very hard to grasp. Now, compare it to our rust version:
|
|
Descriptive and short, like you would expect from a high level language.
Since I didn’t want to mutate the value while checking the parity bit, we just take it out of the equation when it gets accessed:
|
|
Now that we have our Packet, two of them make up a Temperature:
|
|
Our high and low bytes are combined into a single u16 value. Converting the raw value to celsius is done as described in the application notes. The raw formula looks like this: T = Digital Signal / 2047 * (HT - LT) + LT. HT is the higher temperature limit and LT the lower temperature limit. In our case LT = -50 and HT = +150.
Ok, now to the code part where the real work happens. Since we depend on the embedded-hal InputPin trait, we need to make it generic over it:
|
|
Our only public instance method is read, which we need to make generic over the embedded-hal DelayUs trait:
|
|
We read two packets and then turn them into the Temperature struct from above. Of course if something goes wrong we’ll return a TsicReadError instead.
In case you wonder why DelayUs<u8> - the trait needs a specific type which holds the duration itself. In our case a u8 is fine, we do not need larger delays.
Before we dive into read_packet, we need to define a handful of short utility methods which make the other code more readable. First, let’s consolidate the check if a pin is high or low:
|
|
Building on top of it, we need some code that waits until a pin goes either into the high or low state:
|
|
Here is the first part of the read_packet method:
|
|
We need to wait until the pin goes from high to low and then we use the start bit to calculate the strobe length. Calculating the strobe length works like this:
|
|
Every 8 microseconds (our STROBE_SAMPLING_RATE) we check if the pin is still low. If it is, we increment a counter, delay for the sampling rate and repeat. Once the pin goes into a high state again we’ll return from the function and return the strobe length as a Duration.
Zooming back out into our read_packet, we can now fill out the remaining code:
|
|
We performed the loop until we collected all data bits and the parity bit. As you can see after each bit we delay it for the strobe length so that we do our reading exactly once per strobe.
Once we collected all bits, we store it in a Packet.
That’s it! The full code can be found here. Note that it might have evolved over time, so the repository should always be your canonical reference.
What’s missing?
Thanks for sticking with me so far. While I’m pretty happy with the implementation, I think it can still be improved in a number of ways:
- The C code defines a
timeout, which is one thing we can also implement. This would certainly help if a sensor is faulty or the connection is not made properly. - The C code supports other TSic sensor types as well. I don’t have access to them right now, but I can make an effort to port the code to support it as good as possible.
- Add support for fahrenheit. The conversion is trivial and it is handy to not have to do it manually.
There is one final thing I’d like to research: so far the code works fine, but what I’m not clear on is how the code would handle/detect the case if it happens to start a temperature reading while data bits are currently being transmitted. Maybe it could be improved by checking for a number of “high” readings before starting the whole process, or maybe I’m missing something obvious. There’s always more to research!
Please let me know in the comments or in the repository if you have questions.