After my last blog post on the TSIC 306 temperature sensor port to Rust, someone on Reddit mentioned that it does not provide any guidance on how to get the code samples actually running on the chip.
So this post takes a step back and runs you through the basics of setting up a project, configuring it properly and finally running different examples.
Before we dive in I want to mention that I’m still quite new to the embedded world, so some of the information might not be accurate or misleading. If you run into issues please comment below and I’ll do my best to get them fixed.
Also, I noticed that especially this part of the Rust ecosystem evolves very quickly. So if you read this post some time in 2021 or later, double check the tooling and see if it has been further improved.
The full code can be found in this repository.
My Setup
- Hardware: nRF52840 DK
- OS: macOS 10.15.6
- Rust: 1.46.0 installed through rustup
For this post I’m using the nRF52840 DK which contains an Arm Cortex-M4 processor with floating point support. The development kit also contains lots of ports and features that you can use to experiment. Check out the Product Brief for all details.
I first tried to use the ESP32, but I struggled to get it working properly because you need to use a custom LLVM fork and the tooling isn’t there yet. I picked the nRF52840, because ferrous systems were running an embedded workshop using this board and they are so kind as to provide their material free online. I figured this might be the easiest way to start exploring Rust embedded, and indeed it has been pretty painless.
The Knurling Toolchain
Since the initial release of the workshop material (which contained lots of custom code to run, log and flash), many of their tools have been extended and found a new home inside the knurling-rs github organization. In particular, we are going to use:
- probe-run: a custom cargo runner to transparently flash and run our programs.
- defmt: for easy and efficient logging back to the host.
probe-run uses the probe-rs debugging toolkit underneath which is adding features and support for more targets all the time so you might be able to use a similar process as below for your own board.
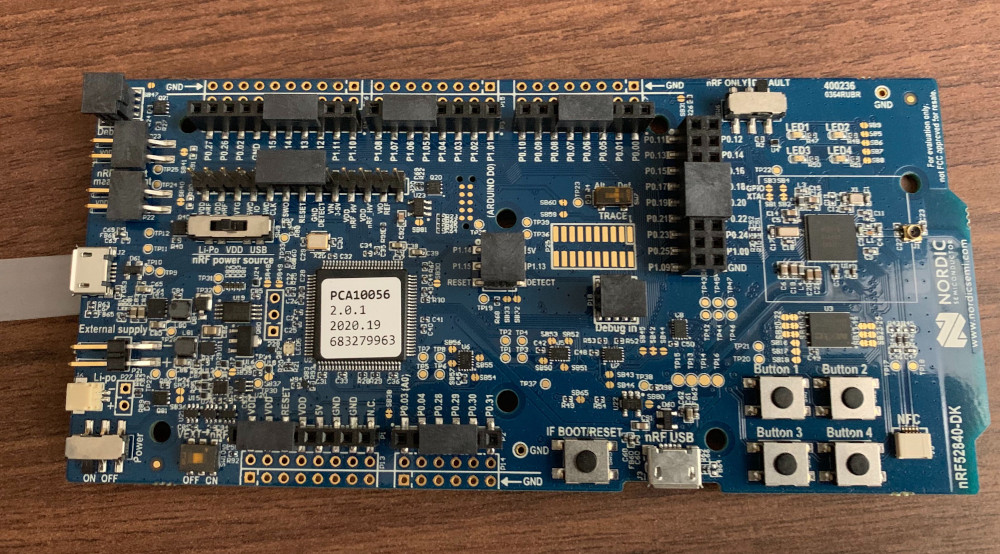
The development kit needs to be connected to your computer via USB like shown in the picture below:
It is important to use the USB port on the left and not the one at the bottom, because I think that’s the only port which contains the J-Link debugging probe (which we are going to use to flash and run our code). This section in the training material describes it in greater detail.
From Zero to “Hello, World!”
Note: if you want to cut corners, you can also use the Cortex-M Template. In this post we’ll start from an empty cargo project and work our way to a flashed device.
Let’s first start with an empty crate:
$ cargo new nrf52840dk-sample --bin
Other than just compiling our code fine with rustc, we also need to achieve the following:
- cross-compile for our embedded target. In our case this is
thumbv7em-none-eabihf. - send the compiled code to our target. We’ll use
probe-rsfor this task throughprobe-run.
To allow us to cross-compile, we need to make sure that rustup has the toolchain needed for our target:
$ rustup target add thumbv7em-none-eabihf
Since by default cargo will build for the host platform we are on, we instruct it through a custom .cargo/config.toml that we always want to build for our target platform instead:
[build]
target = "thumbv7em-none-eabihf"
Next up, let’s work on our main.rs. Our embedded device does not have a full operating system installed, which means we cannot use the standard library. Also, our entry point into the program is not main because the usual bootstrapping infrastructure is not available.
These two attributes hint it to rust:
|
|
If we try to run this on our host, we’ll see the following:
error: cannot find macro `println` in this scope
 --> src/main.rs:5:5
  |
5 |     println!("Hello, world!");
  |     ^^^^^^^

error: `#[panic_handler]` function required, but not found

error: aborting due to 2 previous errors
error: could not compile `nrf52840dk-sample`.
To learn more, run the command again with --verbose.
This tells us two things: first, the println! macro is not available (this is why we are going to use defmt later). Second, we need a panic handler. At this point, things get a bit tricky and we need to bring in our first dependencies (in Cargo.toml):
[dependencies]
cortex-m = "0.6.3"
cortex-m-rt = "0.6.12"
defmt = "0.1"
defmt-rtt = "0.1"
nrf52840-hal = "0.11.0"
The cortex-m and cortex-m-rt crates are our board support crates and provide the hardware abstractions we need in a minute. Since we cannot use println and friends, we include defmt to provide us with a decent logging infrastructure.
Also, to enable defmt logging we need to add these features:
[features]
# set logging levels here
default = [
  "defmt-default",
]

# do NOT modify these features
defmt-default = []
defmt-trace = []
defmt-debug = []
defmt-info = []
defmt-warn = []
defmt-error = []
If those are not present, the code will compile but you won’t see log output on the console.
Ok, so now we can rework our main function a little bit:
|
|
You’ll notice that we switched to defmt for logging, and also use the cortex_m_rt to provide us with an entry function into our program that is compatible with the nRF board.
Finally, we need to set up our panic handler and an exit function. Note that this is a very simplistic version but helps to get us off the ground:
|
|
A cargo run attempt later, we are much closer:
    Finished dev [unoptimized + debuginfo] target(s) in 0.03s
     Running `target/thumbv7em-none-eabihf/debug/nrf52840dk-sample`
target/thumbv7em-none-eabihf/debug/nrf52840dk-sample: target/thumbv7em-none-eabihf/debug/nrf52840dk-sample: cannot execute binary file
We did not get any compile errors, but of course we cannot run an arm executable on our host machine. Time to flash our device!
To do this, we need to install probe-run:
$ cargo install probe-run
Note that if you had it installed before use the -f flag to override the older version. While this installs, we need to open our .cargo/config.toml file once again and enable the custom cargo runner:
[target.'cfg(all(target_arch = "arm", target_os = "none"))']
runner = "probe-run --chip nRF52840_xxAA  --defmt"
rustflags = [
  "-C", "link-arg=-Tlink.x",
  "-C", "link-arg=-Tdefmt.x",
]

[build]
target = "thumbv7em-none-eabihf"
All these properties and flags are from the probe-run docs. If you are using a different chip, I think you can use probe-run --list-chips to find the right one for your device.
At this point we could try to run it, but there are two issues remaining. defmt wouldn’t log anything, and we are lacking our memory layout for the nrf52840.
So, we finally need to add these two lines before our main function:
|
|
Finally, when we now type cargo run, the program gets flashed onto our device successfully:
$ cargo run
   Compiling nrf52840dk-sample v0.1.0 (/Users/daschl/tmp/nrf52840dk-sample)
    Finished dev [unoptimized + debuginfo] target(s) in 0.24s
     Running `probe-run --chip nRF52840_xxAA --defmt target/thumbv7em-none-eabihf/debug/nrf52840dk-sample`
  (HOST) INFO  flashing program
  (HOST) INFO  success!
────────────────────────────────────────────────────────────────────────────────
0.000000 INFO  Hello, World!
└─ nrf52840dk_sample::__cortex_m_rt_main @ src/main.rs:9
stack backtrace:
   0: __bkpt
   1: nrf52840dk_sample::exit
        at src/main.rs:22
   2: nrf52840dk_sample::__cortex_m_rt_main
        at src/main.rs:11
   3: main
        at src/main.rs:7
   4: ResetTrampoline
        at /Users/daschl/.cargo/registry/src/github.com-1ecc6299db9ec823/cortex-m-rt-0.6.13/src/lib.rs:547
   5: Reset
        at /Users/daschl/.cargo/registry/src/github.com-1ecc6299db9ec823/cortex-m-rt-0.6.13/src/lib.rs:550
Accessing Peripherals
With that little victory under our belt, let’s try one more thing: access a peripheral sensor and display its state. In my previous post I used an external sensor, but we can also use a built-in one. The board features a temperature sensor which measures the temperature of the processor.
The first thing we need to add are two more imports for the Peripherals in general and our Temp sensor specifically:
|
|
Inside our main function, we first need to take ownership of the Peripherals and then feed the right TEMP peripheral to our struct:
|
|
Now all we need to do is read the temperature from the sensor and convert it to a i32 so that defmt can log it for us:
|
|
Run your program again and you’ll see something similar to this:
0.000000 INFO processor temp is 24°C
Conclusion
We went from an empty repository to a simple program that reads a temperature sensor and prints it onto your host machines terminal. By not using a template we learned to understand the different components that are at play to get us off the ground. Of course, this is just the start of any real world embedded programming task.
I recommend that you check out the Hardware Abstraction Layer as a next step and make yourself familiar with the different capabilities. If you are looking for more complex applications, you probably also want to look at RTIC which is a framework for building real-time concurrent applications.
Finally, you can check out the full code in this repository. Please let me know in the comments if you have further questions or if I messed something up in this post!